OLD MAN YELLS AT CLOUD
Lord of the Files
Run Your Unity ML Executable in the Cloud
Beginner's guide to Xvfb, x11vnc, Unity, OpenGL and friends.
If, like me, you are trying to get your Unity executable to run in a cloud server like AWS EC2, or GCP, this guide is for you. Unity is just an example here, this should work with pretty much any graphics based executable, or also just if you want a remote desktop.
Basics - Why Won't it Run?
Since we're using Unity as an example, let's say that you have a compiled unity executable, which you use to render images for training ML models. Can you just run it headlessly in a cloud server with no display? Why don't we try to run the command:
Welcome to Ubuntu 20.04.2 LTS (GNU/Linux 5.8.0-1038-gcp x86_64)
[this is running on a cpu-only GCP instance]
daniel@34.126.185.12:~$ cd unity-executable
daniel@34.126.185.12:~/unity-executable$ ./build.x86_64
Set current directory to /home/daniel/unity-executable
Found path: /home/daniel/unity-executable/build.x86_64
As expected, it crashes.
It's always good to try and find the exact reason for the crash. In our Unity example, there's not much useful showing up in the console, but a useful argument is -logfile log.txt. We can then read this log for clues, and figure out what is wrong. In general, though, those clues can be unhelpful, or not very explicit. If you can't find the exact reason, let's look at the most common ones.
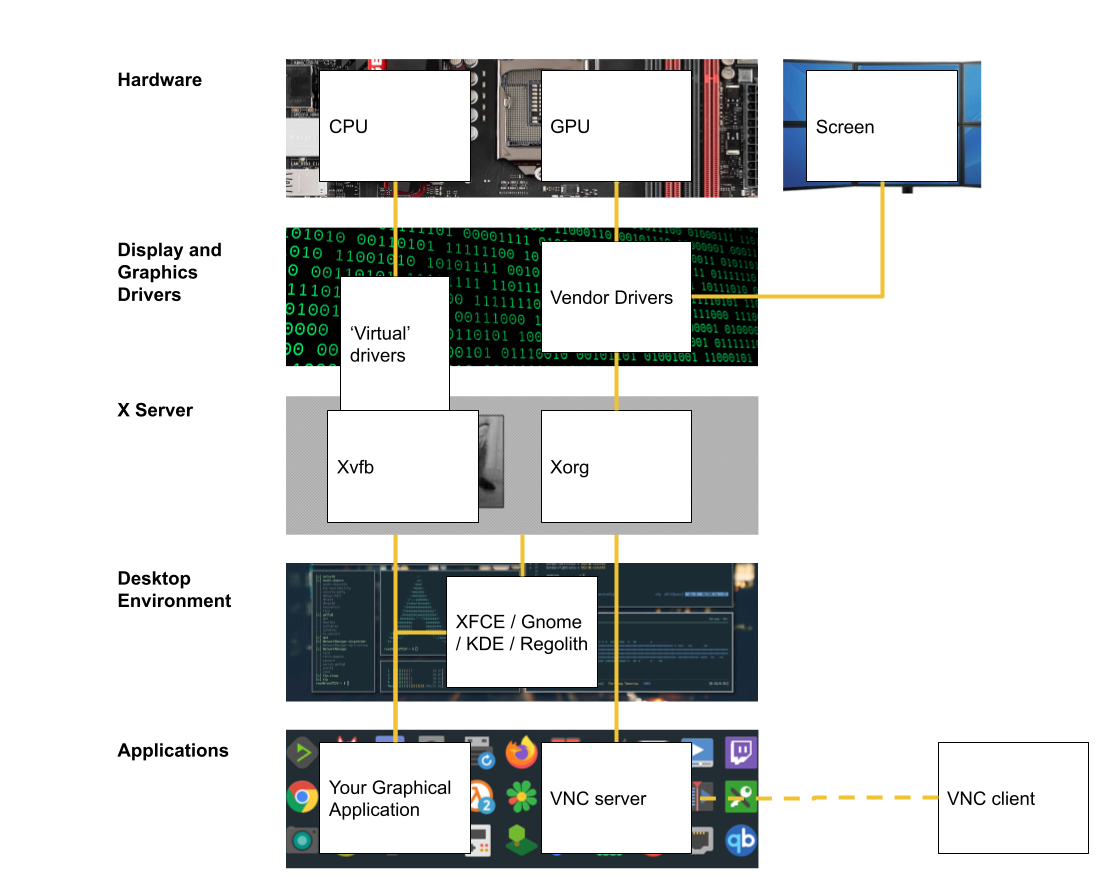
Usually the reason our executable works on our computer but not on the server is because it requires three things:
- An X server / graphical display
- A graphics driver with sufficiently high OpenGL version
- A desktop environment (sometimes)
So our goal today will be to make sure we have these 3 things set up and working on our display-less server.
Note: There are of course always other ways of reaching the same goal. For example, one way is to modify the executable so that it runs without a display. In the case of Unity you could in theory run the executable headless with the -batch and -headless arguments. But.. according to the developers doing that disables the rendering. Huh.

I want to focus here on getting those 3 requirements instead, because it is quite useful in many cases.
1.a Creating a Virtual Graphical Environment with Xvfb (CPU-only):
Note: Xvfb is meant for machines which don't have graphics hardware. But, if you're using an instance with a GPU, and want your graphics executable to run on the GPU, Xvfb isn't for you. (Note: this doesn't affect programs which interface with the GPU through CUDA, like tensorflow). If you want to use the GPU for graphics, you'll have to start the x server headlessly using your GPU vendor's display drivers. Skip to part 1.b for an example on how to do so.
First we need to make sure we've installed the dependencies.
sudo apt update
sudo apt install -y xorg-dev \
libglu1-mesa libglu1-mesa-dev libgl1-mesa-dev freeglut3-dev mesa-common-dev \
xvfb libxinerama1 libxcursor1 mesa-utils
Now let's create a virtual screen on display ':0' (you can put any number here, :1, :2, etc., as long as you use the same one in later steps)
Xvfb :0 -screen 0 1024x768x24 +extension GLX +render -noreset >> xsession.log 2>&1 &
Now, to run commands in this screen, just prepend that command with DISPLAY=:0 ("DISPLAY=:0 ./mycommand"). If you want everything to run in this display, you can also just add "export DISPLAY=:0" to your .bashrc, for example.
So what exactly did this do? Basically, this starts an X server session running with a virtual screen. If you could look at that screen, you would see that it is all black (there's no desktop environment yet). Actually, there is a way to look at that screen, by streaming it to a remote computer (see part 4).
1.b Creating a Virtual Graphical Environment with Nvidia Drivers (GPU):
Skip to Part 2. if you ran Part 1.a successfully and don't want OpenGL to run on a GPU device
If you're using an nvidia GPU, here's how to set up the X Server / OpenGL:
# run this command to find your GPU bus id (for example PCI:0:30:0)
nvidia-xconfig --query-gpu-info
# replace the busid flag with your value
# Note: with headless GPUs (e.g. Tesla T4), which don't have display outputs, remove the --use-display-device=none option
sudo nvidia-xconfig --busid=PCI:0:30:0 --use-display-device=none --virtual=1280x1024
this will have created a file in /etc/X11/xorg.conf, allowing the X server to use the GPU properly. You can now start it
# unlike the startx command, this only starts the x server, no desktop environment
sudo Xorg :0
and check that opengl is set up to run on the gpu with:
DISPLAY=:0 glxinfo | grep version
nvidia-smi # xorg should show up in the running programs
if this works, you can skip parts 1 and 2. If not, it is usually a driver issue. In order, make sure to check that your GPU is found by the nvidia-xconfig command, that the bus value is correct, that the --use-display-device=none option is correct, check the /var/log/Xorg.0.log for errors (search for the term nvidia), and make sure nvidia drivers are installed.
2. Graphics Drivers and OpenGL
One nice thing about having this virtual screen running is that it makes using OpenGL possible. Many graphical applications rely on OpenGL, and so this is quite important. We can check that it is indeed usable, and the available version using the glxinfo command (installed with sudo apt install mesa-utils)
[On the server, before we ran Xvfb]
$ glxinfo
Error: unable to open display
[after running Xvfb]
$ DISPLAY=:0 glxinfo | grep version
server glx version string: 1.4
client glx version string: 1.4
GLX version: 1.4
Max core profile version: 4.5
Max compat profile version: 3.1
Max GLES1 profile version: 1.1
Max GLES[23] profile version: 3.2
OpenGL core profile version string: 4.5 (Core Profile) Mesa 20.2.6
OpenGL core profile shading language version string: 4.50
OpenGL version string: 3.1 Mesa 20.2.6
OpenGL shading language version string: 1.40
OpenGL ES profile version string: OpenGL ES 3.2 Mesa 20.2.6
OpenGL ES profile shading language version string: OpenGL ES GLSL ES 3.20
GL_EXT_shader_implicit_conversions, GL_EXT_shader_integer_mix,
So now, we've made sure that we have a virtual display, and that OpenGL is usable, which is good. However, a source of many problems is the OpenGL version. Some programs require that OpenGL be at least a certain version, and will refuse to run otherwise (Unity, for example).
The issue here is that the max OpenGL version is tied to the graphics driver being used, and hardware. If you're on a GPU instance (and are sure the X server is running on the GPU, see Part 1.b), the only way of increasing it is by updating the GPU drivers (the procedure depends on vendor - nvidia / intel). If you're on a CPU-only instance, I found that using a later version of Ubuntu (20) also set OpenGL to a higher version (high enough to run Unity), by upgrading llvmpipe. It might also be hardware dependent. This is a tricky topic to find an answer to, your mileage may vary.
3. Desktop Environment
A Desktop environment (abbreviated DE) is the thing that shows you a desktop background, windows (through a window manager), a mouse pointer, and so on. Some applications interact with the DE, and so it might be necessary to run one. It can also be useful if you want to use the server as a remote desktop.
There's several choices for DEs, popular ones include gnome (the default ubuntu one), xfce (a light DE), KDE, regolith, etc.. In this example, I'll use xfce to save on disk space, though you can easily switch to another
sudo apt install -y xfce4-session
DISPLAY=:0 startxfce4
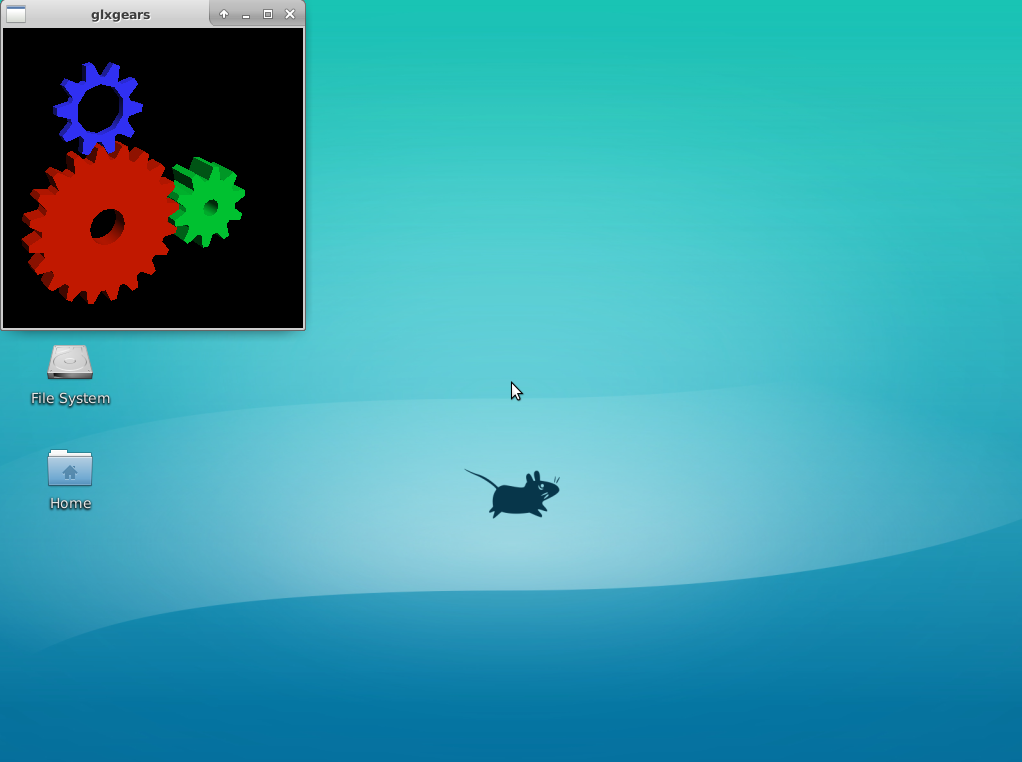
That's it. If you could now look at the virtual display, you would see a background, icons and so on.
4. VNC, remote desktop
It can be useful to see our virtual screen. To do that, we stream it to another computer using a vnc remote desktop application. For this we will use x11vnc as the server (fetches the image on the virtual screen and streams it online), and realvncviewer as the client (connects to the stream from another computer, and shows it).
sudo apt install -y x11vnc
x11vnc -display :0 -usepw -rfbport 5901
This should ask you to set a password, which you will need later to connect from the client
One small issue with doing this is that often, firewall settings block outside machines from connecting to the server on the VNC port. In this case, we're using port 5901, so we should create a firewall rule in the server provider's interface to allow this specific port.
For example, on the Google Cloud Platform, in the search bar type "Firewall", click the first result. Click "Create Firewall Rule"
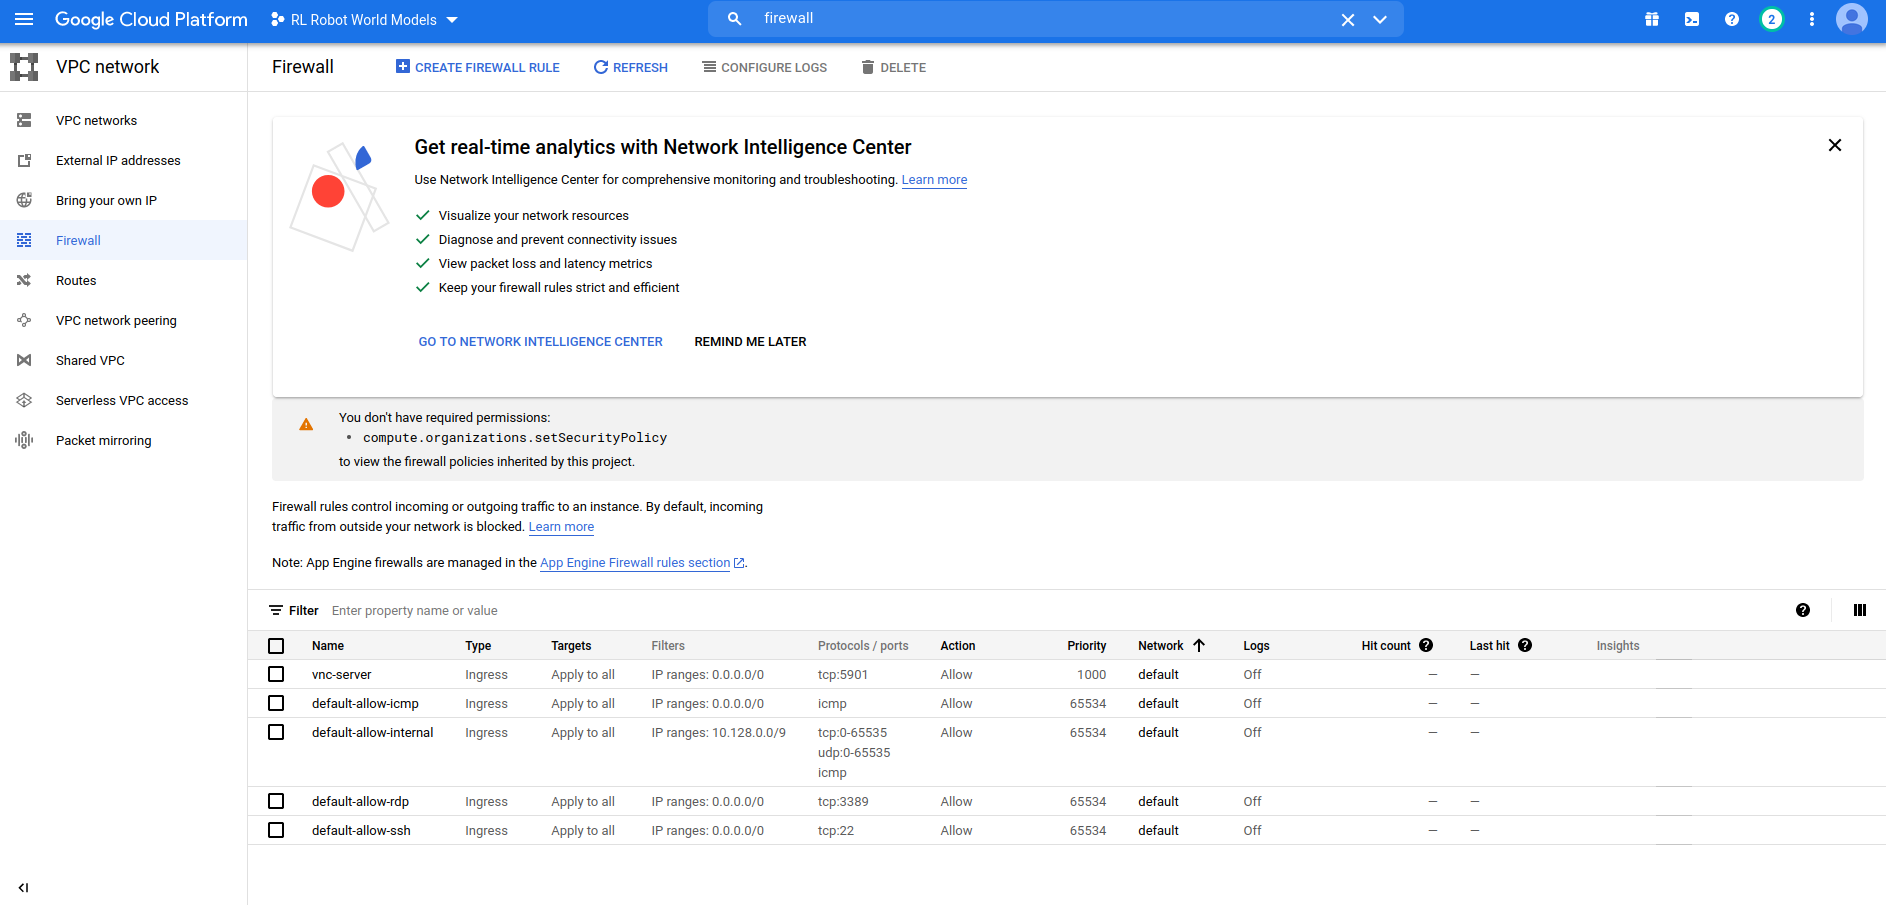
Apply the rule to incoming connections ("ingress"), from all ip ranges (0.0.0.0/0), select the instances you want it to apply to (in my case I set all instances) and enable the tcp port that you want (5901).
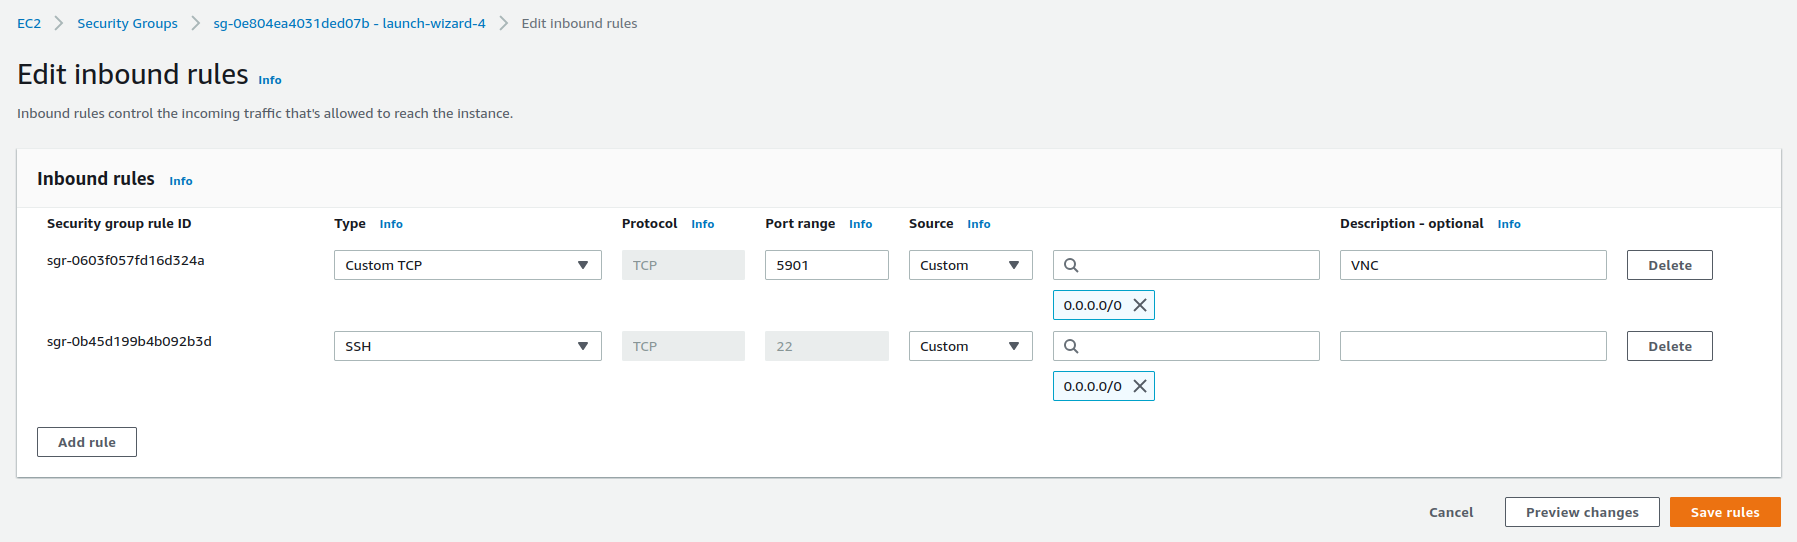
Or, if you're using AWS, click your instance, then the Security tab below, click the link to the instance's security group, click 'Edit Inbound Rules', and add a rule with the same parameters (TCP port 5901, all ips).
Let's test it: on your normal machine, install the vnc client (for example realvncviewer). Run it, create a new connection to your server address:port (for example 34.126.185.12:5901 or ec2-13-54-127-20.eu-north-1.compute.amazonaws.com:5901), and type the password you set earlier. The screen should appear, and you should be able to see your executable running on the server.